Sunday 19 July 2015

How to use DTMF module

The picture says it all. If you have any doubt regarding this, let me know. Feel free to comment here.

You can connect PWDN pins to ground from microcontroller or through hard wiring. Choice is yours, I suggest the method of hard wiring. In this, I had opted for hard wiring.
First check it manually. Connect +5V piin to 5 volt and GND pin to ground. Now connect 3.5mm audio jack (male) to Input. If it is not working try another mobile phone.

DTMF MODULE in action.


Saturday 18 July 2015

Tuotorial to began your microcontroller based projects

First of all, you need basic tools like multimeter, wire stripper, tweezer, soldering iron and its stand, solder wire.


Now you have to check 7805 whether its working or not. You can simply insert 7805 into breadboard and then provideFor best results, use tin plated zero pcb/perfboard/stripboard. You have to insert components from the non-tinned end.

Will soon update it.  Stay tuned...

Friday 17 July 2015

Temperature controlled dc fan using Atmega16

Bill of Materials:

1. Atmega 16A with IC base
2. 7805 voltage regultor
3. LM35 temperature sensor
4. Perfboard (tin-plated)
5. Soldering Iron (15W) with stand
6. Soldering wire
7. Jumper wire for soldering
8. LCD 16*2,10k POT and male berg strip (optional)
9. DC fan (as used in computer smps) cheapest one

Note: If DC fan rating is 12V then use external power supply of 12V and  1A else use 9V battery (HiWatt Only) with snip connector.

Wednesday 15 July 2015

Multifunction robot


AT89S52
 11.0592 MHz Xtal
22pf cap - 2
because in ATMega16 we have option of using Internal calibrated RC Oscillator
9 volt battery (HiWatt ) with snip connector
7805 voltage regulator
DTMF MODULE with 3.5 mm audio jack (male)
L293d ic with ic base
Dc geared motor 2
1 Chasis
2 Tyres
1 castor wheel
Perfboard/Zero PCB  (Silver coated big size)
Jumper wire for soldering
Solder Wire
Soldering Iron
Soldering iron stand
Lm 35 temp sensor
lm 358 with ic base
Ultrasonic sensor
5 female-female jumper wire
1 berg strip-male 

Tuesday 14 July 2015

This is for comment section for general discussion regarding project, and any other doubt.

Feel free to post your valuable comments regarding the project, hardware /software related issues

and miscellaneous issues.

DTMF based wireless robot


Source Code for DTMF based wireless robot :

#include<avr/io.h>
#include<util/delay.h>
void main(void)
{
unsigned int k, h;
DDRA=0x00;

DDRD=0XFF;
while (1)
{
k =PINA;
//h=k & 0x0F;
switch (k)
{
case 0x20: //if I/P is 0x02
{
PORTD=0x89;//O/P 0x89 ie Forward
break;
}
case 0x80: //if I/P is 0x08
{
PORTD=0x86; //O/P 0x86 ie Backward
break;
}
case 0x40:
{
PORTD=0x85; // Left turn
break;
}
case 0x60:
{
PORTD=0x8A; // Right turn
break;
}
case 0x50:
{
PORTD=0x00; // Stop
break;
}
}
}
}

IDE Used : AVRStudio4

Compiler Used: AVR-GCC

Schematics of  DTMF based wireless robot


 Instead of switch, in actual project we will use DTMF module which will give four bit output which will be input for the microcontroller (ATMega16). And using these input we can drive motor using driver ic L293D.


Bill of materials:

ATMega16 with ic base
If you are using AT89S52 then use crystal anf pf capacitor else not required
          11.0592 MHz Xtal
          22pf cap - 2
because in ATMega16 we have option of using Internal calibrated RC Oscillator
9 v battery (HiWatt)
7805 voltage regulator
DTMF MODULE with 3.5 mm audio jack (male)
L293d ic with ic base
Dc geared motor 2
1 Chasis
2 Tyres
1 castor wheel
Perfboard/Zero PCB  (Silver coated big size)
Jumper wire for soldering
Solder Wire
Soldering Iron
Soldering iron stand
Lm 35 temp sensor
lm 358 with ic base

You can download Source code and proteus  simulation from https://drive.google.com/file/d/0B4Px6Drl6Zz_VGJxUVNyYWpfUms/view?usp=sharing


DTMF based home automation system

Source Code:

#include<avr/io.h>
#include<util/delay.h>

void main()
    {
    unsigned char val=0;
    DDRB=0x00;     // configure PORTB as input (DTMF outputs are connected to lower nibble)
    PORTB=0xff;    // enable pull-up resistor of PORTB
    DDRD=0xff;     // configure PORTD as output
    PORTD=0x00;    // PORTD low
    while(1)
        {
        val=PINB;

        switch(val)
            {
            case 0xf1:
                PORTD=0x01;    // relay 1 ON
                break;
              
            case 0xf2:
                PORTD=0x00;    // relay 1 OFF
                break;

            case 0xf3:
                PORTD=0x02;    // relay 2 ON
                break;
              
            case 0xf4:
                PORTD=0x00;    // relay 2 OFF
                break;

            case 0xf5:
                PORTD=0x04;    // relay 2 ON
                break;
              
            case 0xf6:
                PORTD=0x00;    // relay 2 OFF
                break;

            case 0xf7:
                PORTD=0x08;    // relay 2 ON
                break;
              
            case 0xf8:
                PORTD=0x00;    // relay 2 OFF
                break;

            default:
                PORTD=0x00;    // all realy OFF
                break;
            }

            }
    }

Microcontroller Used : Atmega16
IDE: AVStudio 4
Compiler: AVR GCC.

Schematics:


Bill of materials:

9 Volt battery (Hiwatt) with snips
7805 voltage regulator
AT89S52 with ic base
11.0592 MHz Xtal22pf cap - 2
DTMF MODULE with 3.5 mm audio jack (male)
Uln 2003 with Ic base
6Volt relay - 4
5 Led
Perfboard/Zero PCB  (Silver coated big size)
Jumper wire for soldering
Solder Wire
Soldering Iron
Soldering iron stand


Where to buy components and its tentative price

From chandni chowk metro station, exit from gate number 5 and go to lajpat rai market.

Shop nos. are 594-legend electronics, 595-bonus electronics anf infront of them is everest electronics.

These are just suggestions, you can buy from anywhere you want to buy.

Tentative price:

AT89S52  - 40 INR/-
PERFBOARD  - 20 INR/-  (depends upon size)
IC BASE  - 5 INR/-  (40 pin)
IC BASE  - 3 INR/- (18/16 pin)
9 v battery  - 15 INR/- (HiWatt only)
Battery Snip Connector  - 5 INR/-
Relay  - 15 INR/- (6 volt)
L293d  - 35 INR/-
LM35  - 50 INR/-
Geared Dc motor  - 60 INR/-
Castor wheel  - 25/30 INR/-
Chasis  - 70 INR/-
Tyres  - 40 INR/-
Soldering iron  - 80 INR/- (15 watt) (siron company)
Solder Wire  - 60 INR/- (Bharti)
IR module- 20-25 INR/-
LCD 16*2- 110 INR/-


I will update the list .... short term memory loss

Links to datasheets and all other stuffs

It includes 8051 source code, atmega 16 source code, arduino e books, arduino library for proteus and how to make projects in Keil Uvision4 IDE.


If you have any doubt, please post your valuable comments.

https://drive.google.com/folderview?id=0B4Px6Drl6Zz_flNKUUVOQ2U2NDZhamxxWWhpQVAxQ01WSUpTMzJQQlVhTE1CNFM3WnVCSkk&usp=sharing

Monday 13 July 2015

AVRStudio4 compilation error

just copy msys-1.0.dll to C:\WinAVR-20100110\utils\bin directory (WinAVR)

you can download it from the link provided.

https://drive.google.com/file/d/0B4Px6Drl6Zz_X0JQRWo2azVNcEU/view?usp=sharing

Serial Communication using 8051

Please click on the link provided.

https://drive.google.com/file/d/0B4Px6Drl6Zz_eTJ1ZTZ5MERLbDg/view?usp=sharing

Friday 10 July 2015

DIY arduino board

You can make your own arduino board provided you need a  programmer to upload programme on the board. We can make USBasp programmer from the previous post.
 
Arduino had lots of varities e.g. Arduino NG, Arduino Uno, Arduino Mega , etc.

We are going to use Arduino NG which uses Atmega8/Atmega168 or we can also use Arduino UNO which uses Atmega328.

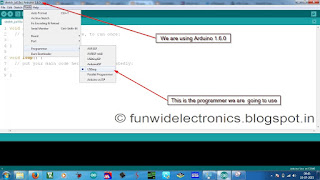
We are using Arduino IDE 1.6.0 and we have to click on Tools>Programmer>USBasp


 Then we have to click on Tools>Boards>Arduino NG or older.